Guide for organizing scientific projects
One of the challenges scientists face daily is how to organize and keep track of complex research projects. In this lesson, we'll see how to apply the skills you learnt in the workshop to organize a scientific project and produce reproducible results.
This lesson is based on this paper.
This paper and this other are good examples of what you can achieve.
Best practices
- Use a standard directory layout
- Use version control as much as you can
- Automate as much as you can
- Document each folder's contents in a
README.mdfile - Document procedures in notebooks
Organizing your files
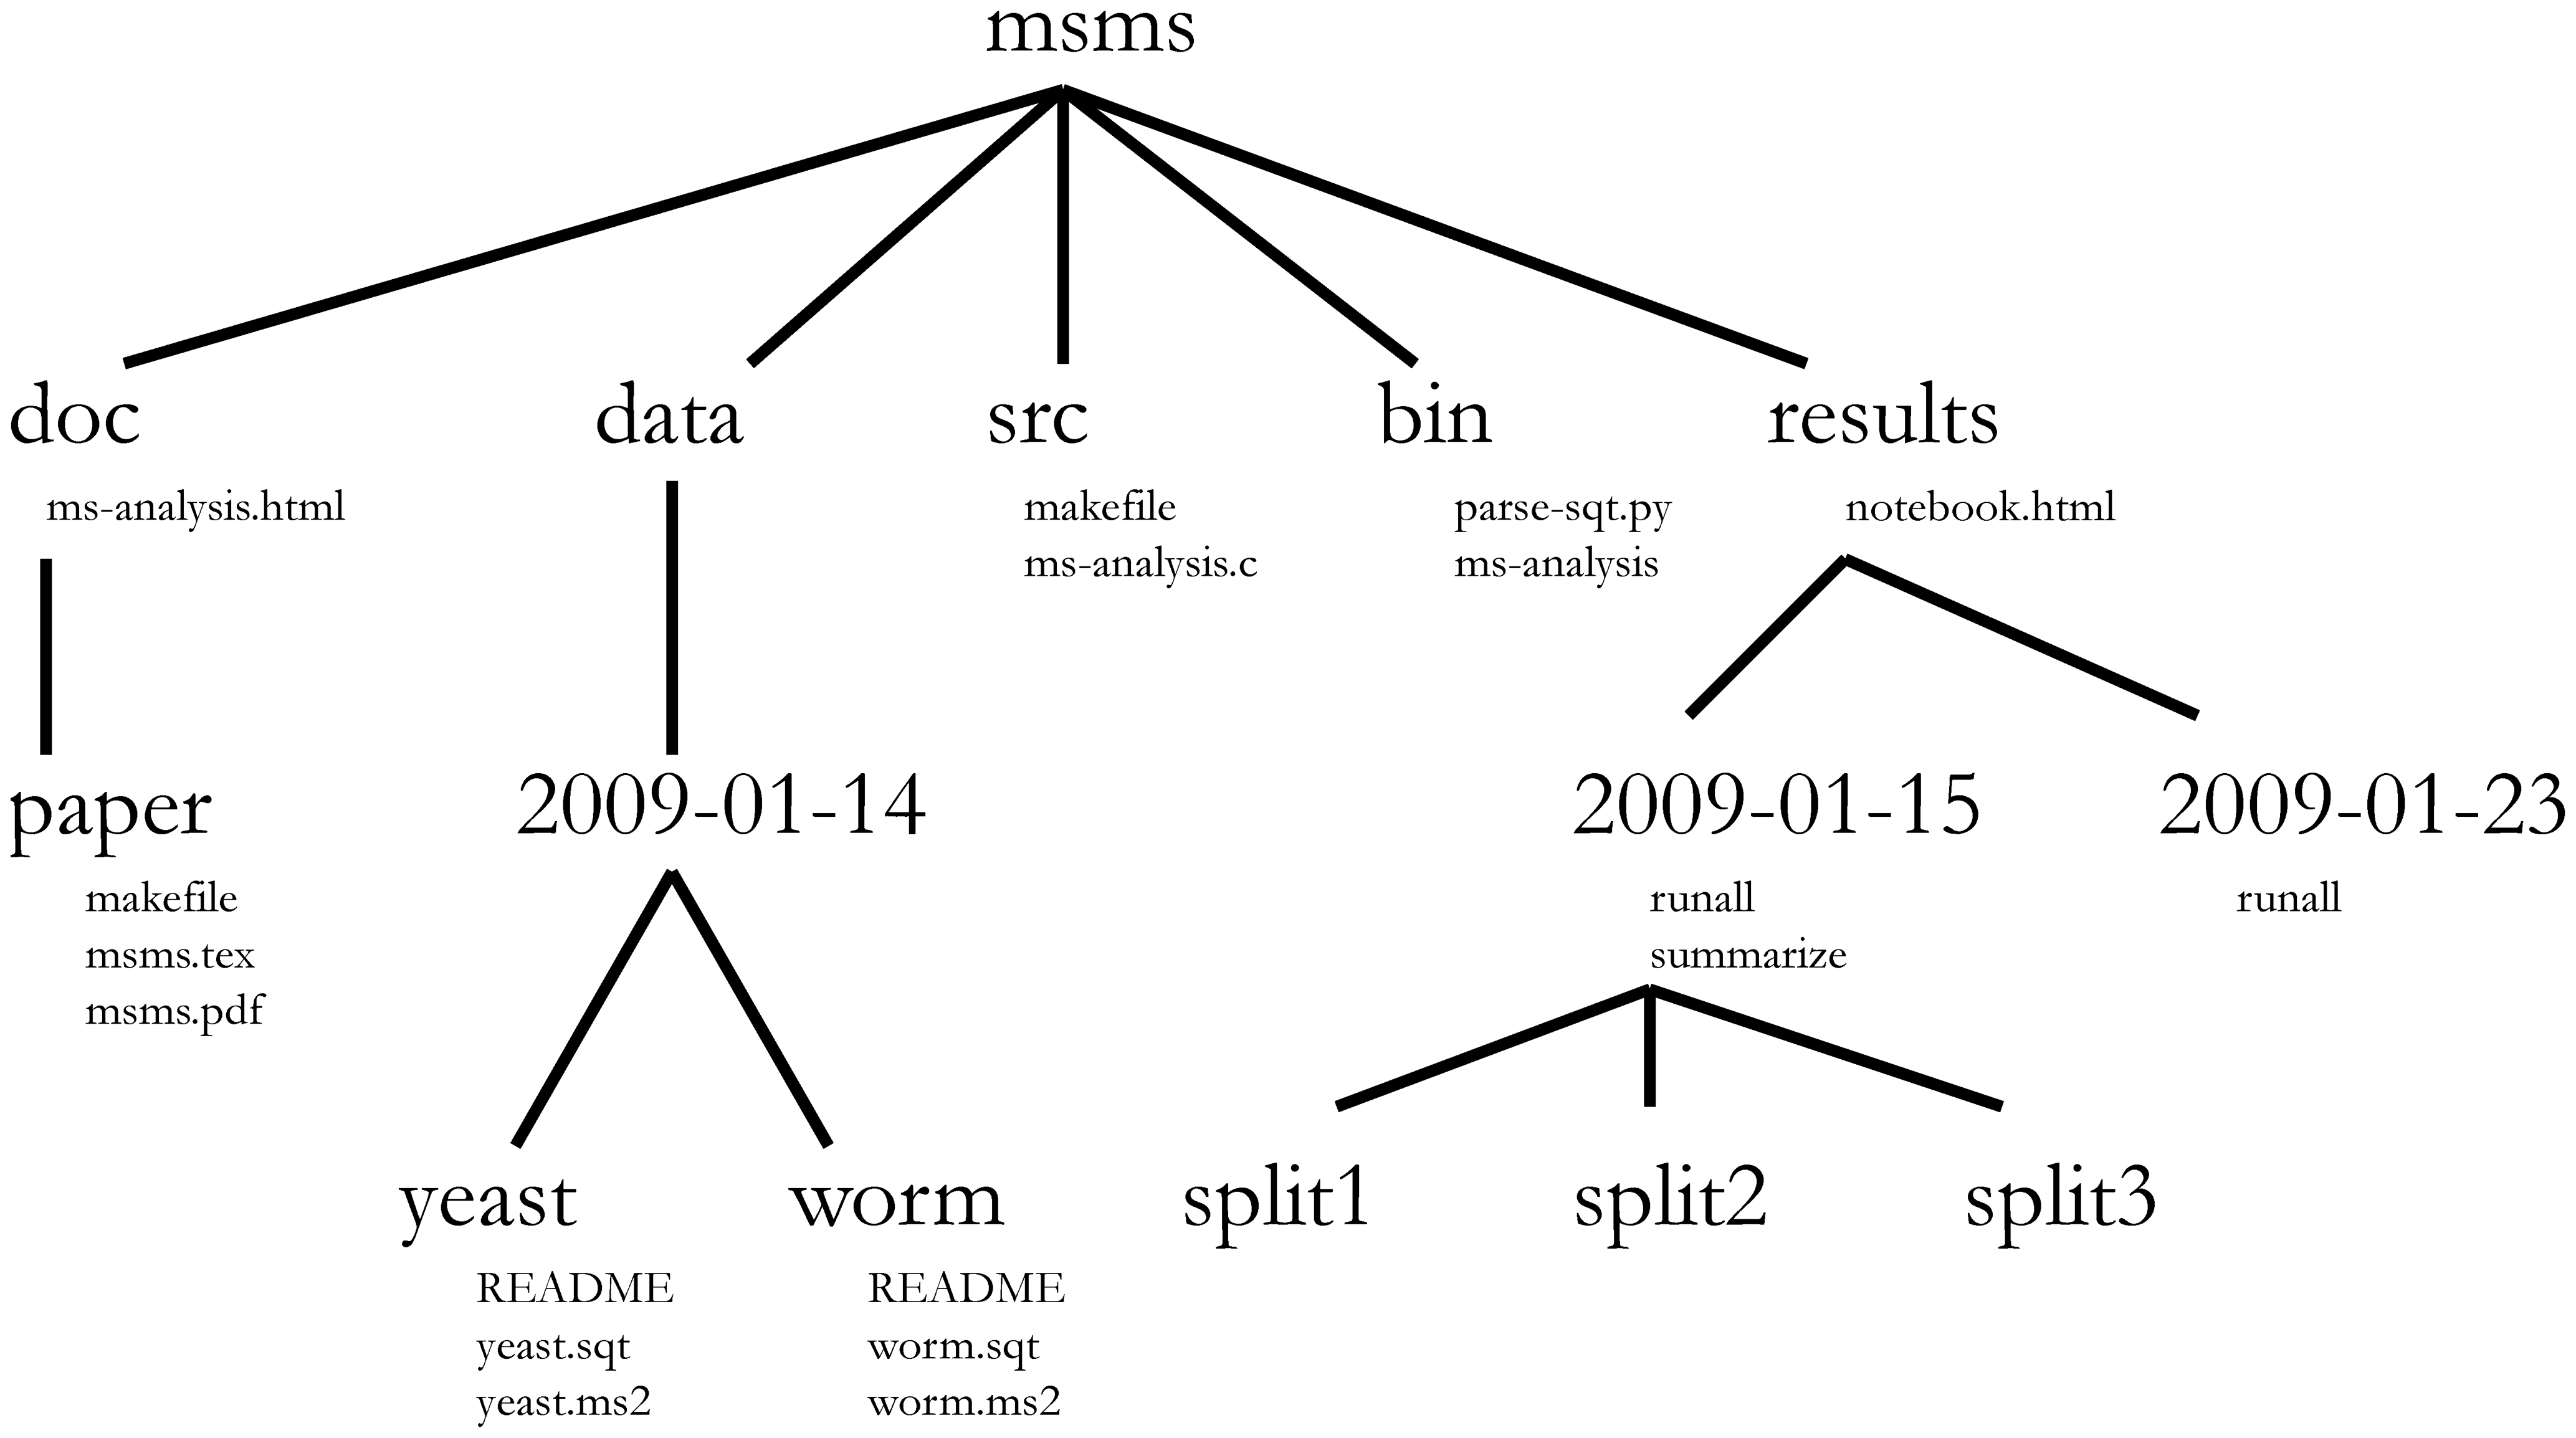
Plan your project ahead and structure your directory layout accordingly. Here we will adapt the following structure:
Exercises
Create a project for a clinical study to test a new drug. You have two groups of patients taking placebo or tylenol. You get a new file with inflammation data for each group evey week. The project is called
inflammation. Decide the folder layout and create the top folder structure.Add a
README.mdat the top level to describe the project. Use a text editor and Markdown.Create a local git repo and upload it to github.
Let's change to the directory (you don't need to do this in your terminal):
!pwd
import os
os.chdir('files/inflammation')
Dealing with data
We will use the inflammation data from the python lesson. Collaborators send us the files all mixed up. Files with odd number are tylenol, even placebo. We will automate the addition of data to the project, so all files are renamed and put under version control.
Prep
Download a clean copy of the inflammation data to your Desktop.
Exercises
Create a notebook at the top level to do exploratory work and test stuff.
Using the notebook make a function that takes a file name and return a modified string. If the number of the filename is odd, return "tylenol", of even return "placebo". Write a test and a docstring for the function.
python assign_drug.py inflammation_1.dat
tylenol
python assign_drug.py inflammation_4.dat
placebo
Hint You can use slicing or the split() function for strings to have a more general code. Use ? to get help in the notebook.
Make a bash script that takes a date in yyyy-mm-dd format and a filename and copies this file to a new folder 'yyyy-mm-dd' inside data/ with a new name made up with the date and the type of drug. The script has only echo the commands to get this one, but run nothing:
bash add_data.sh 2014-11-07 inflammation_1.dat
cp inflammation_1.dat data/2014-11-07/2014-11-07-tylenol.dat
bash add_data.sh 2014-11-07 inflammation_2.dat
cp inflammation_1.dat data/2014-11-07/2014-11-07-placebo.dat
Put the script in bin/ and commit.
Modify the script to add and commit automatically the new file. Use -m option for commit to write a meaningful message:
bash add_data.sh 2014-11-07 inflammation_2.dat
File committed to the repo: "Add new data file for placebo on 2014-11-07"
Commit the script when you're done.
This script won't work if the inflammation files are not in the same directory where the script is. Improve the python script to be able to use a full path for the inflammation file as the third argument. The function to strip off the filename from a full path is os.path.basename(). Note that you have to import the module os to be able to use it. To figure out how to use it, run help(os.path.basename()) on the notebook.
A possible implementation of the python script is:
!cat src/assign_drug.py
A possible implementation of the bash script is:
!cat src/add_data.sh
Let's add four files pretending is data for the two days of the workshop:
src/add_data.sh 2014-11-07 ~/Desktop/inflammation_01.cvs data
src/add_data.sh 2014-11-07 ~/Desktop/inflammation_02.cvs data
src/add_data.sh 2014-11-08 ~/Desktop/inflammation_03.cvs data
src/add_data.sh 2014-11-08 ~/Desktop/inflammation_04.cvs data
Now:
!ls data/*
!pwd
You repo should look something like this:
git log --graph --decorate --pretty=oneline --abbrev-commit

* e22c112 (HEAD, origin/master, master)Add file ../data/2014-11-07/2014-11-08-tylenol.dat
* 01a2a88 Add file ../data/2014-11-07/2014-11-08-placebo.dat
* a78b89f Add file ../data/2014-11-07/2014-11-07-tylenol.dat
* aec9768 Add file ../data/2014-11-07/2014-11-07-placebo.dat
* 79e8824 Add bash script to add data.
* 0d00f07 Add documentation to function.
* 5e5f0c0 Add script to assing drug
* 9acf832 Add gitignore
* 667808b Add script to assign drug
* ac1ab14 Initial commit
Dealing with code
Let's use the code we created yesterday to analyze the inflammation data. Copy the code into your scratch notebook.
%matplotlib inline
import numpy as np
from matplotlib import pyplot as plt

data = np.loadtxt(fname='inflammation-01.csv', delimiter=',')

plt.figure(figsize=(10.0, 3.0))

plt.subplot(1, 3, 1)
plt.ylabel('average')
plt.plot(data.mean(0))

plt.subplot(1, 3, 2)
plt.ylabel('max')
plt.plot(data.max(0))

plt.subplot(1, 3, 3)
plt.ylabel('min')
plt.plot(data.min(0))

plt.tight_layout()
plt.show()

Prep
- run the scratch notebook and get sure all works. A good idea is to stop/restart the kernel before to clean up what's in the notebook's memory (see the "Kernel" tab on the notebook toolbar).
- run all the cells
Exercise
Modify the code to make function called analyze that takes a date in yyyy-mm-dd format and saves the plot as a pdf file into the results folder. Apart for saving the file, the function should print a message.
analyze_inflammation(2014-11-07-tylenol.dat)
Plotting result in ./result/2014-11-07-tylenol.pdf
A possible implementation is:
import os
import numpy as np
from matplotlib import pyplot as plt

def make_filename_for_plot(filename):
    '''Makes a filename for the plot given the data filename

    Parameters
    ----------
        filename: str
             Path to the file for data to analyze. Can be relative or absolute.
    '''
    filename = os.path.abspath(filename)
    plot_filename = os.path.basename(filename)[:-4] + '.pdf'
    data_dir = os.path.dirname(os.path.dirname(os.path.abspath(filename)))
    results_dir = os.path.join(os.path.dirname(data_dir), 'results')
    return os.path.join(results_dir, plot_filename)

def analyze_inflammation(filename):
    '''Makes a plot of average, min, and max

    Parameters
    ----------
        filename: str
             Path to the file for data to analyze. Can be relative or absolute.
    '''
    filename = os.path.abspath(filename)
    data = np.loadtxt(fname=filename, delimiter=',')

    plt.figure(figsize=(10.0, 3.0))

    plt.subplot(1, 3, 1)
    plt.ylabel('average')
    plt.plot(data.mean(0))

    plt.subplot(1, 3, 2)
    plt.ylabel('max')
    plt.plot(data.max(0))

    plt.subplot(1, 3, 3)
    plt.ylabel('min')
    plt.plot(data.min(0))

    plt.tight_layout()

    filename_for_plot = make_filename_for_plot(filename)
    plt.savefig(filename_for_plot)

    print('Plotting result in ' + filename_for_plot)

analyze_inflammation('data/2014-11-07/2014-11-07-tylenol.dat')
Making a script out of a notebook
You can save the notebook as a python script that we can run from the terminal. From the terminal run:
ipython nbconvert --to python scratch.ipynbCheck out that a new file was created:
ls src/*.pyRename the script to analyze_inflammation.py and commit.
Python script with arguments
The script above is not ready to take arguments from the command line.
Exercises
Modify the code to take an argument to analyze the data for a particular date and saves the plot into results.
python analyze_inflammation.py ./data/2014-11-07/2014-11-07-tylenol.dat
Plotting result in ./result/2014-11-07-tylenol.pdf
Adding a feature to your code
Once your analysis is working, you should be careful that new code doesn't break existing code. A workflow commonly uses the branching features of git.
git allows you to keep several histories in parallel, called branches. The default history/branch is called master and is the only we have now in our inflammation repo. Let's add a new feature to the code: documentation for the scripts.
First, let's check our repo's branches:
cd inflammation/src
git branch
* master
Create a new branch called document-scripts-properly:
git checkout -b document-scripts-properlyThis creates and switches to a new branch 'document-scripts-properly' which has the same contents as you had in the working directory.
* document-scripts-properly
  master
Let's add some documentation about the arguments of the analyze_inflammation-py script and make a couple of new commits:
nano analyze_inflammation.py
git add analyze_inflammation.py
git commit -m "Add documentation about the script arguments"
nano analyze_inflammation.py
git add analyze_inflammation.py
git commit -m "Add documentation about usage"
These two commit were made in the document-scripts-properly branch. If we need to we can go back any time to the master branch which is in the same state as when we created the document-scripts-properly branch. This allows to make changes to the code without interfering with the master branch, which is always in a good working state. After our work in the document-scripts-properly branch are finished and tested, we can incorporate the changes by merging together the two branches:
git checkout master
git merge document-scripts-properly
Reproducing the project
Ideally, we should be able to reproduce all the results of the project as automatically as possible. One way to do this is to have a script sitting right under the project directory that just calls all the other scripts to do the analysis.
make is a program often use to do this. make looks for a file called Makefile in which you specify all the steps to reproduce the project and its dependencies.
An simple Makefile for this project is this:
!cat Makefile
The Makefile is divided in sections. Each section start with a word followed by a semicolon. This word is called a target. After the line with the target, you write the commands that will be executed upon calling this target. E.g, entering this command in the shell:
~bash make analyze
will execute to:
for i in data/*/*.dat; do python src/analyze_inflammation.py i; done;Targets can have dependencies, so when such target is called, its dependencies are executed. E.g.:
make allwill expand to:
rm results/*.pdf
for i in data/*/*.dat; do python src/analyze_inflammation.py i; done;
Therefore, to reproduce the results of this project from scratch in any computer we need to enter only two commands in the shell:
git clone [URL from Github] .
make all
Running your code in Odyssey
Clone your repo to the cluster
ssh iglpdc@login.rc.fas.harvard.edu
mkdir inflammation
cd inflammation
git clone [clone link from Github] .
Note the dot at the end of the last command.
Get an interactive session
The login node shouldn't be used to run computation, so let's move to a computing node. Note that our home folder gets mounted there automatically, i.e. no need to clone the repo again in the node.
srun --pty --mem=4000 -t 0-6:00 -p interact /bin/bashMake note of hostname that appears in the prompt after the @ symbol (e.g. holy2a18304). The computing nodes do not include much software and we have to manually "install" python using these commands.
source new-modules.sh
module load python
You should be able to run python and IPython now in the command line. Try with:
ipython --versionRun a notebook in the cluster, interact with it from your laptop
If you want to use the notebook though, you need an extra step to be able to see the notebook in your browser.
Open another terminal
ssh -L 8888:holy2a18304:8888 login.rc.fas.harvard.eduwhere you instead of hostname you must use the hostname from above, e.g. holy2a18304. This just tunnels the notebook webpages from the computing node throught the login node to your laptop.
Run the IPython notebook in the node
cd inflammation/src
ipython notebook
Open new web browser window in your laptop and go to http://localhost:8888
You should be able to see your notebooks. Note that now the node is the computer running the calculations: your laptop is just displaying them. This a good way to do visualizations or exploratory analysis that requires more computing power than what your laptop can offer.